Sign Up
Screenplay Storyboard: Turn Your Script into Visual Scenes Step by Step
Author:
Narek Ghazaryan
Date:
April 25, 2026
A screenplay describes the story. A storyboard shows it. The screenplay storyboard process bridges that gap. You take written scenes and turn them into visual panels that map every camera setup, character position, and transition. Without this step, productions lose time on set figuring out shots that should have been planned in advance. Every frame you plan on paper saves hours of expensive on-set decisions. This guide walks through five steps to draw scenes by script. Go from first slugline to locked screenplay storyboard.
What a Screenplay Storyboard Does
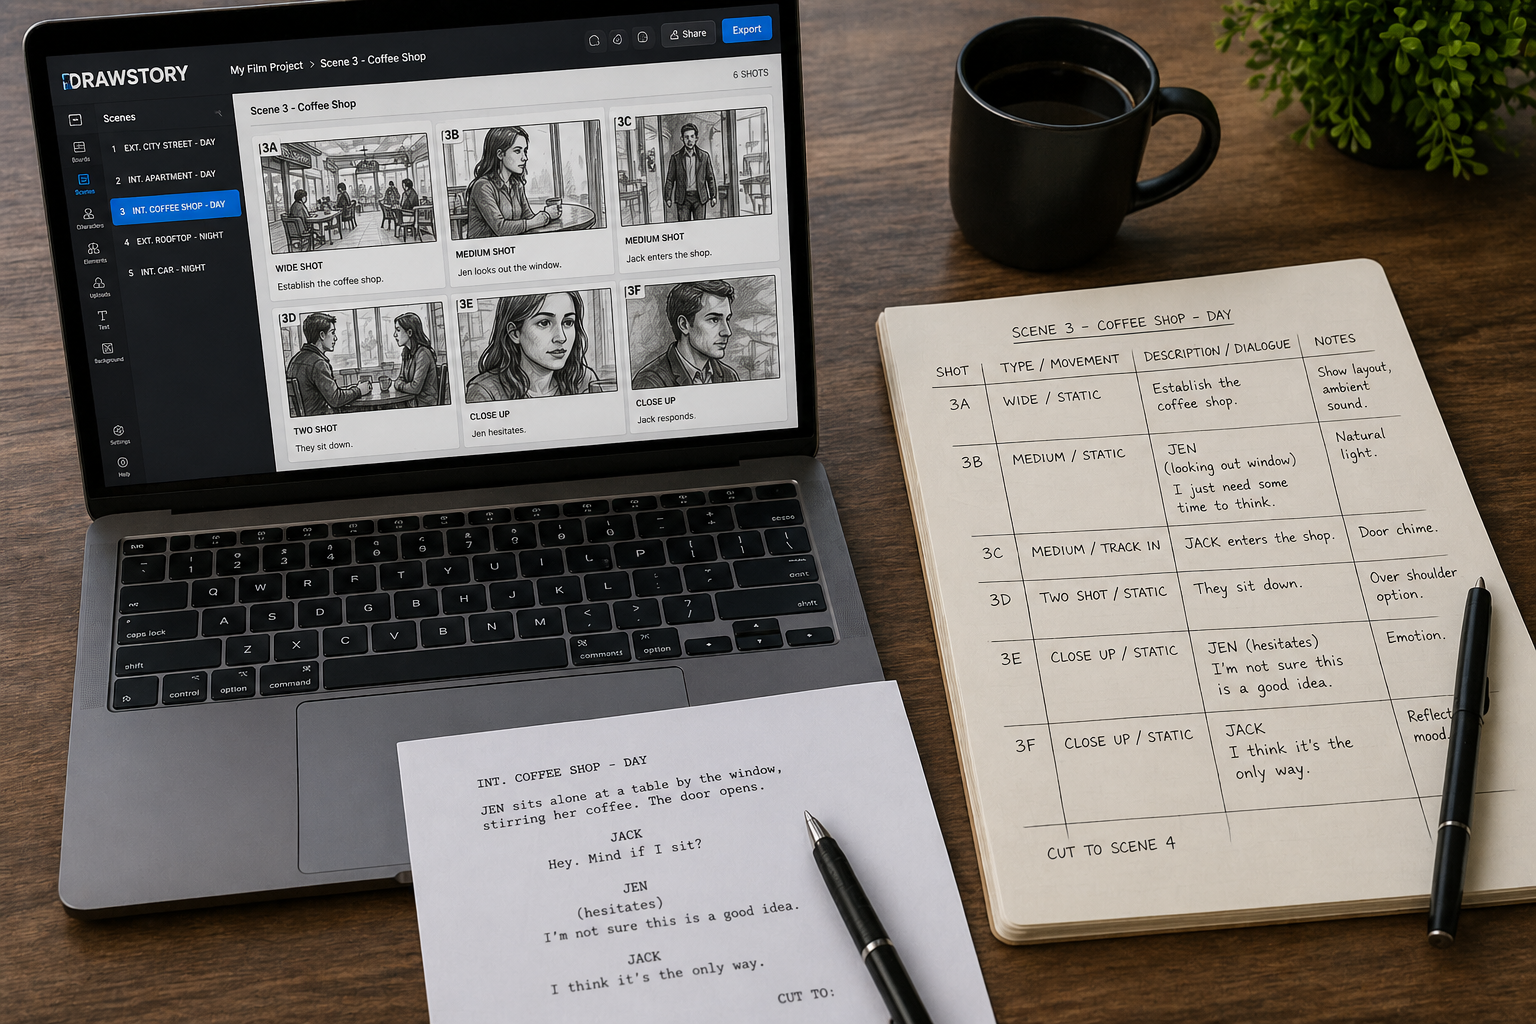
A screenplay storyboard translates written scenes into sequential visual panels. Each panel represents one camera setup. Together, the panels show blocking, framing, and transitions across the full script. The screenplay storyboard turns the writer's words into the director's visual plan.
Screenplays carry more storyboard direction than most people realize. Sluglines set the location. Action lines describe movement. Dialogue cues suggest close-ups for emotional beats. A script to storyboard AI tool reads these elements and generates frames automatically. The screenplay format itself is a visual blueprint waiting to be drawn.
Step 1: Break Down Your Screenplay by Scene
The screenplay storyboard workflow starts with scene boundaries. Read the full screenplay from start to finish. Mark every scene break. Each slugline marks a new scene. INT. COFFEE SHOP. EXT. ROOFTOP. Every change in location or time starts a fresh scene.
Note the key details for each scene. Location, time of day, characters present, and the core action. A 90-page feature screenplay averages 40 to 60 scenes. Short films run 5 to 15. Knowing the total scene count sets the scope for your storyboard screenplay project.
Group scenes by location. This helps with production scheduling later. It also reveals visual patterns. Three scenes in the same apartment need consistent framing. A text to storyboard workflow starts with this same scene-level breakdown before generating any frames.
Step 2: Build a Shot List from Each Scene
Each scene in a screenplay storyboard needs a shot list before any frame gets drawn. The shot list breaks one scene into individual camera setups.
Read the scene and identify key moments. Character entrances, physical actions, reveals, and dialogue exchanges each need their own shot. Assign a camera angle to every moment. Wide shots establish the space. Medium shots cover dialogue. Close-ups carry emotion. Over-the-shoulder angles connect two characters in conversation.
Note camera movement for each shot. A slow pan across a room builds tension. A static wide shot creates calm. A quick dolly-in adds urgency. Mark these directions next to each shot.
Most scenes need 3 to 8 shots. Action sequences run higher. Quiet dialogue scenes run lower. Film composition principles guide every framing choice in the shot list. The list becomes the direct input for your screenplay storyboard panels.
Step 3: Sketch or Generate Your Storyboard Frames
Each shot from the list becomes one storyboard panel. This is where the screenplay storyboard becomes visual.
Traditional storyboards use hand-drawn frames. Stick figures work. Basic shapes work. The goal is composition and framing, not fine art. Place characters in the frame. Show their positions relative to each other and the camera.
Modern workflows use AI tools to generate frames from scene descriptions. You paste the scene text. The tool produces illustrated panels with character positions, backgrounds, and framing. A 10-page short film script can produce a complete storyboard in minutes.
Freelance storyboard artists charge $10 to $120 per frame (source: Vox Illustration). AI tools generate equivalent frames at a fraction of that cost. For a 50-scene screenplay with 5 shots each, that means 250 frames. The cost difference is significant at scale. How filmmakers create storyboards with AI covers the modern generation workflow in detail.
Label every frame with scene number, shot number, and a brief description. A well-labeled screenplay storyboard is searchable and easy to reference on set.
Step 4: Add Dialogue, Notes, and Transitions
Raw storyboard frames show composition. A production-ready screenplay storyboard needs more context beneath each panel.
Place key dialogue lines under the relevant frame. Not every line needs to appear. Focus on the lines that drive the shot. If a close-up exists because of an emotional monologue, include that dialogue.
Add camera direction notes. Pan left. Zoom in. Dolly out. These annotations tell the crew what movement to plan. Mark transitions between scenes. Cut, dissolve, fade to black. The transition choice affects pacing and the audience experience.
Include audio cues where they matter. A musical sting, a door slam, silence. Sound drives visual rhythm in a screenplay storyboard. Professional storyboard examples show how annotations transform basic panels into complete production references.
Step 5: Review and Revise with Your Team
A storyboard screenplay project needs input beyond one person. Share the completed boards with the director, cinematographer, and department heads.
The director checks overall pacing and visual tone. The DP reviews framing and lighting feasibility. The production designer confirms that sets match the storyboard locations. Each perspective catches problems that a single creator misses.
Gather specific feedback. Does this wide shot establish the space clearly? Does the close-up land at the right emotional beat? Should the camera move here or stay static?
Revise panels based on team notes. Replace frames that need different angles. Adjust compositions that conflict with practical constraints. Then lock the storyboard. A locked board becomes the shooting reference for the entire production. Previsualisation takes this locked storyboard and extends it into animated sequences for complex scenes.
Screenplay Elements That Guide Your Storyboard
A well-written screenplay contains most of the visual direction a storyboard needs. Knowing where to find it speeds up the screenplay storyboard process.
Sluglines set location and lighting. INT. signals indoor lighting setups. EXT. signals natural light. DAY and NIGHT set the color temperature. These details inform every panel's background and mood.
Action lines describe movement and blocking. "She crosses to the window" tells you the character's position changes. "He slams the door" tells you the framing needs to show impact. Each action line translates into a storyboard beat.
Parentheticals hint at emotion and delivery. "(whispered)" suggests an intimate close-up. "(shouting)" suggests a wider frame that shows physical intensity. Dialogue itself drives shot selection. Long speeches call for medium or close-up coverage. Rapid exchanges call for shot-reverse-shot patterns.
Transitions written in the script guide panel flow directly. CUT TO means a hard visual break. DISSOLVE TO means a softer blend between scenes. These cues shape the visual rhythm of the screenplay storyboard.
AI vs Traditional Storyboarding from a Screenplay
AI handles volume and speed. Traditional artists handle nuance and custom style. The best results combine both. They let you visualize story content completely. Use AI to generate the first pass across all scenes. Then refine key frames by hand where the story demands precision.
The AI storyboard generation market is projected to reach $9.46 billion by 2033 with a 23.7% CAGR (source: Dataintelo). That growth reflects demand from productions that need fast visual planning. The best AI storyboard generators let you visualize a story from screenplay to finished boards in a single session.
Common Mistakes When Storyboarding a Screenplay
● Skipping the shot list. Jumping from screenplay to storyboard frames without planning shots produces random panels. A screenplay storyboard needs structure.
● Storyboarding every single line. Not every action line needs its own panel. Focus on key moments that define the scene. Entrances, turning points, reveals, and exits.
● Ignoring camera movement. A pan, tilt, or dolly adds energy. Mark movement in every panel that needs it. Static frames work for calm moments. Moving frames work for tension.
● Not matching the screenplay's tone. A horror script needs dark framing and tight compositions. A comedy needs open, well-lit frames. The screenplay storyboard should feel like the movie looks.
Visualize Your Screenplay Today
Your screenplay already holds the visual blueprint. Every slugline, action line, and dialogue cue points toward a storyboard frame. Break down the scenes. Build the shot list. Generate or draw the panels. DrawStory turns scripts into storyboard panels with locked characters and consistent framing. AI storyboarding built for filmmakers who want to visualize a story from page to screen.
Frequently Asked Questions
Got Questions?
Find clear answers to common questions about Drawstory, our services, process, and how we bring your ideas to life.
What is a screenplay storyboard?


How do you turn a screenplay into a storyboard?
How many storyboard frames does a typical script need?
What is the difference between a shot list and a storyboard?
How long does it take to create a storyboard?
